
AI-900: Microsoft Azure AI Fundamentals
PDFs and exam guides are not so efficient, right? Prepare for your Microsoft examination with our training course. The AI-900 course contains a complete batch of videos that will provide you with profound and thorough knowledge related to Microsoft certification exam. Pass the Microsoft AI-900 test with flying colors.

Curriculum for AI-900 Certification Video Course
| Name of Video | Time |
|---|---|
 1. Introduction to Azure |
5:00 |
 2. The Azure Free Account |
5:00 |
 3. Concepts in Azure |
4:00 |
 4. Quick view of the Azure portal |
4:00 |
 5. Lab - An example of creating a resource in Azure |
11:00 |
| Name of Video | Time |
|---|---|
 1. Machine Learning and Artificial Intelligence |
2:00 |
 2. Prediction and Forecasting workloads |
1:00 |
 3. Anomaly Detection Workloads |
1:00 |
 4. Natural Language Processing Workloads |
2:00 |
 5. Computer Vision Workloads |
1:00 |
 6. Conversational AI Workloads |
1:00 |
 7. Microsoft Guiding principles for response AI - Accountability |
2:00 |
 8. Microsoft Guiding principles for response AI - Reliability and Safety |
1:00 |
 9. Microsoft Guiding principles for response AI - Privacy and Security |
1:00 |
 10. Microsoft Guiding principles for response AI - Transparency |
1:00 |
 11. Microsoft Guiding principles for response AI - Inclusiveness |
1:00 |
 12. Microsoft Guiding principles for response AI - Fairness |
1:00 |
| Name of Video | Time |
|---|---|
 1. Section Introduction |
1:00 |
 2. Why even consider Machine Learning? |
4:00 |
 3. The Machine Learning Model |
9:00 |
 4. The Machine Learning Algorithms |
9:00 |
 5. Different Machine Learning Algorithms |
3:00 |
 6. Machine Learning Techniques |
4:00 |
 7. Machine Learning Data - Features and Labels |
5:00 |
 8. Lab - Azure Machine Learning - Creating a workspace |
6:00 |
 9. Lab - Building a Classification Machine Learning Pipeline - Your Dataset |
11:00 |
 10. Lab - Building a Classification Machine Learning Pipeline - Splitting data |
7:00 |
 11. Optional - Lab - Creating an Azure Virtual Machine |
9:00 |
 12. Lab - Building a Classification Machine Learning Pipeline - Compute Target |
6:00 |
 13. Lab - Building a Classification Machine Learning Pipeline - Completion |
6:00 |
 14. Lab - Building a Classification Machine Learning Pipeline - Results |
8:00 |
 15. Recap on what's been done so far |
2:00 |
 16. Lab - Building a Classification Machine Learning Pipeline - Deployment |
7:00 |
 17. Lab - Installing the POSTMAN tool |
4:00 |
 18. Lab - Building a Classification Machine Learning Pipeline - Testing |
6:00 |
 19. Lab - Building a Regression Machine Learning Pipeline - Cleaning Data |
9:00 |
 20. Lab - Building a Regression Machine Learning Pipeline - Complete Pipeline |
3:00 |
 21. Lab - Building a Regression Machine Learning Pipeline - Results |
3:00 |
 22. Feature Engineering |
3:00 |
 23. Automated Machine Learning |
6:00 |
 24. Deleting your resources |
2:00 |
| Name of Video | Time |
|---|---|
 1. Section Introduction |
2:00 |
 2. Azure Cognitive Services |
1:00 |
 3. Introduction to Azure Computer Vision solutions |
3:00 |
 4. A look at the Computer Vision service |
5:00 |
 5. Lab - Setting up Visual Studio 2019 |
4:00 |
 6. Lab - Computer Vision - Basic Object Detection - Visual Studio 2019 |
12:00 |
 7. Lab - Computer Vision - Restrictions example |
2:00 |
 8. Lab - Computer Vision - Object Bounding Coordinates - Visual Studio 2019 |
3:00 |
 9. Lab - Computer Vision - Brand Image - Visual Studio 2019 |
2:00 |
 10. Lab - Computer Vision - Via the POSTMAN tool |
5:00 |
 11. The benefits of the Cognitive services |
2:00 |
 12. Another example on Computer Vision - Bounding Coordinates |
2:00 |
 13. Lab - Computer Vision - Optical Character Recognition |
5:00 |
 14. Face API |
2:00 |
 15. Lab - Computer Vision - Analyzing a Face |
3:00 |
 16. A quick look at the Face service |
3:00 |
 17. Lab - Face API - Using Visual Studio 2019 |
6:00 |
 18. Lab - Face API - Using POSTMAN tool |
5:00 |
 19. Lab - Face Verify API - Using POSTMAN tool |
7:00 |
 20. Lab - Face Find Similar API - Using POSTMAN tool |
8:00 |
 21. Lab - Custom Vision |
9:00 |
 22. A quick look at the Form Recognizer service |
2:00 |
 23. Lab - Form Recognizer |
8:00 |
| Name of Video | Time |
|---|---|
 1. Section Introduction |
1:00 |
 2. Natural Language Processing |
3:00 |
 3. A quick look at the Text Analytics |
1:00 |
 4. Lab - Text Analytics API - Key phrases |
4:00 |
 5. Lab - Text Analytics API - Language Detection |
1:00 |
 6. Lab - Text Analytics Service - Sentiment Analysis |
1:00 |
 7. Lab - Text Analytics Service - Entity Recognition |
3:00 |
 8. Lab - Translator Service |
3:00 |
 9. A quick look at the Speech Service |
1:00 |
 10. Lab - Speech Service - Speech to text |
4:00 |
 11. Lab - Speech Service - Text to speech |
1:00 |
 12. Language Understanding Intelligence Service |
2:00 |
 13. Lab - Working with LUIS - Using pre-built domains |
8:00 |
 14. Lab - Working with LUIS - Adding our own intents |
4:00 |
 15. Lab - Working with LUIS - Adding Entities |
2:00 |
 16. Lab - Working with LUIS - Publishing your model |
2:00 |
 17. QnA Maker service |
2:00 |
 18. Lab - QnA Maker service |
9:00 |
 19. Bot Framework |
2:00 |
 20. Example of Bot Framework in Azure |
3:00 |
| Name of Video | Time |
|---|---|
 1. About the exam |
5:00 |
Microsoft Azure AI AI-900 Exam Dumps, Practice Test Questions
100% Latest & Updated Microsoft Azure AI AI-900 Practice Test Questions, Exam Dumps & Verified Answers!
30 Days Free Updates, Instant Download!
AI-900 Premium Bundle
- Premium File: 303 Questions & Answers. Last update: Jan 23, 2026
- Training Course: 85 Video Lectures
- Latest Questions
- 100% Accurate Answers
- Fast Exam Updates
Microsoft AI-900 Training Course
Want verified and proven knowledge for Microsoft Azure AI Fundamentals? Believe it's easy when you have ExamSnap's Microsoft Azure AI Fundamentals certification video training course by your side which along with our Microsoft AI-900 Exam Dumps & Practice Test questions provide a complete solution to pass your exam Read More.
AI-900 Certification Guide: Learn Microsoft Azure AI Fundamentals Quickly
Artificial Intelligence has emerged as one of the most transformative forces in modern technology, reshaping how organizations operate, how decisions are made, and how value is created in business and society. For professionals seeking to build a foundational understanding of AI principles, the Microsoft Azure AI Fundamentals certification, commonly referred to as AI‑900, presents an excellent starting point. This exam introduces candidates to the core concepts of artificial intelligence, machine learning, and the suite of AI services available on the Microsoft Azure platform. Preparing for AI‑900 is not simply a matter of memorizing definitions; it involves building a solid conceptual understanding and learning how to apply AI tools to solve real-world problems. Many aspiring professionals draw parallels between preparing for AI‑900 and their experiences with other industry certifications that demand both theory and practical application, as this helps frame their study approach with strategy, persistence, and context in mind. By understanding AI‑900 within the broader landscape of certification preparation, learners can cultivate the discipline necessary to succeed and to translate that knowledge into workplace impact, which increasingly relies on intelligent systems and data‑driven insights.
Certification Preparation Through Scenario‑Based Learning
When approaching foundational certifications, one of the most effective methods is scenario‑based learning, where concepts are applied to real problems rather than studied in isolation. For example, those who prepare for the Salesforce Certified Industries CPQ Developer Certification often engage deeply with complex pricing configuration and quoting scenarios. This process encourages learners to connect abstract terminology with concrete solutions, reinforcing cognitive links that improve recall and understanding. Similarly, when preparing for AI‑900, working through hypothetical use cases involving computer vision, conversational AI, or predictive analytics strengthens the learner’s ability to contextualize Azure AI services.
Instead of merely memorizing what a service does, candidates explore how it is applied, how it interacts with data, and how it can be used to deliver measurable outcomes. This approach echoes across certification disciplines, illustrating that mastering fundamentals involves not just reading but applying, testing, and refining understanding. For AI‑900 aspirants, engaging with practical examples can demystify how machine learning models are trained, how cognitive services interpret unstructured data, and how AI solutions can solve business challenges such as sentiment analysis, customer support automation, and image recognition. Embedding these insights into your study plan prepares you for both the exam and real project scenarios where such skills are increasingly valuable.
Translating Technical Concepts Into Business Value
Learning AI basics also involves appreciating how technical capabilities translate into business value. This is a lesson embodied in many non‑AI certification journeys as well. For instance, candidates preparing for the Salesforce Certified Marketing Cloud Developer Certification must understand how marketing automation tools drive engagement, optimize campaigns, and support strategic business objectives. This requires analyzing customer data, segmenting audiences, and automating processes to improve efficiency, precisely the kind of strategic thinking that AI‑900 encourages in an AI context.
When studying Azure AI Fundamentals, learners are encouraged to move beyond technical definitions and examine how services such as language understanding and predictive analytics influence outcomes like customer satisfaction, operational efficiency, and data‑driven decision making. For example, AI‑900 candidates might explore how natural language processing can summarize support tickets or detect sentiment in feedback surveys, providing actionable insights that help organizations respond more effectively. By drawing connections between technical capabilities and business results, you cultivate an appreciation for how foundational AI knowledge empowers professionals to drive value across functional areas. This strategic perspective helps future AI practitioners position themselves as contributors to organizational growth rather than merely as technicians who understand code.
Integrating Services and Understanding Data Flow
A cornerstone of AI‑900 preparation is learning how AI services integrate with other systems and data pipelines. This mirrors challenges encountered in other technical disciplines that require systems thinking. For instance, professionals preparing for the Salesforce Certified MuleSoft Developer I Certification focus on connecting disparate applications and managing APIs to create seamless data flows. This teaches learners to anticipate points of integration, transform data to meet system requirements, and ensure that information flows efficiently and accurately between systems.
AI‑900 candidates similarly need to understand data ingestion, preprocessing, and how Azure AI services consume and return information. Whether working with structured data in a database or unstructured text in documents, mastering data flow concepts ensures that AI models have the right inputs and that outputs are meaningful. Hands‑on labs and practice scenarios help learners visualize how cognitive services like computer vision or speech recognition fit into larger workflows, such as a customer support pipeline or automated document processing system. Recognizing how services integrate builds confidence and prepares you to design AI solutions that are robust, scalable, and aligned with organizational needs, which is central to both certification success and practical application.
Structuring Your AI Learning Like a Project
Preparing for a rigorous certification exam is often likened to managing a complex project with milestones, dependencies, and deliverables. In this context, understanding structured project planning tools can enhance your study approach. For example, examining the Overview Of The Asana Project Management Tool: How It Works And Benefits offers insight into how tasks can be organized, tracked, and adjusted based on progress and priority. While focuses on project management tools, the principles apply directly to preparing for AI‑900. Creating a study roadmap, allocating time for each domain of the exam, and monitoring your progress against learning goals help ensure that you cover all necessary topics, such as AI workloads, computer vision services, and ethical AI considerations. Project management methodologies teach the importance of iteration, reflection, and adaptation, all of which are vital when learning complex subjects. Setting incremental goals, reviewing areas of difficulty, and adjusting your plan based on practice test results mirrors how professionals manage technical projects in the workplace. This disciplined approach lessens overwhelm, builds momentum, and enables you to learn strategically rather than reactively, a mindset that supports both exam preparation and lifelong professional growth.
Anticipating Challenges and Building Resilience
Every certification journey presents challenges, and knowing how to respond to them is a key differentiator between those who pass and those who struggle. Many professionals preparing for leadership or management certifications encounter this reality; for example, the PMP Exam Difficulty, Challenges, Preparation Tips And Success Strategies outlines common hurdles such as time management, breadth of content, and exam stress, along with strategies to address them effectively. These lessons translate to AI‑900 preparation because the foundational concepts, while not overly technical, require thoughtful assimilation and the ability to analyze scenarios.
Recognizing that challenges are part of the learning process helps you develop resilience and maintain motivation. When you encounter difficult topics, such as the differences between supervised and unsupervised learning or nuances in cognitive service capabilities, approaching them with curiosity and persistence will deepen understanding. Strategies such as spaced repetition, reflective journaling on key concepts, and group study discussions can help you reinforce learning and approach each topic with confidence. Preparing for AI‑900 is not just about acquiring knowledge—it is also about developing the mindset to engage with complexity, adapt to new information, and persist through uncertainty, which are skills that serve well beyond the exam.
Managing Risks in Your Study Plan
Risk management is not only a business discipline; it is also valuable in planning your learning journey. When preparing for AI‑900, anticipating potential setbacks, identifying areas where you may need additional practice, and creating contingencies enhances your overall preparation. This idea is similar to the insights shared in the Best 15 Risk Management Strategies And Tools, which emphasizes proactive identification of risks and structured mitigation planning.
For exam preparation, risks might include underestimating the time needed to understand machine learning principles, overlooking ethical considerations in AI solutions, or failing to gain hands-on experience with services like computer vision and language understanding. Addressing these risks early can involve scheduling dedicated practice sessions, seeking out interactive labs, or joining study communities for peer support. Viewing your study plan through a risk‑aware lens encourages deliberate action rather than passive reading and supports more consistent progress toward your certification goal. Recognizing and planning for risks cultivates a thoughtful and mature approach to learning, enhancing not only your readiness for the AI‑900 exam but your ability to tackle future professional challenges where risk management is equally essential.
Building a Broader Technical Context
Foundational AI knowledge is enriched by understanding how it intersects with other technology domains and digital platforms. For example, professionals exploring content management and digital experience platforms often delve into sites like Sitecore Certification Training to understand how platforms deliver personalized content at scale. While the focus is on a different certification domain, the underlying theme of integrating technical expertise with strategic objectives resonates with AI‑900 preparation.
Azure AI services can enhance content platforms by providing personalization driven by sentiment analysis, image classification, and recommendation engines. Learning how AI augments traditional systems helps you develop a holistic view of technology ecosystems. AI‑900 prepares you to recognize these intersections, enabling you to conceive solutions that not only leverage intelligent services but also support broader digital goals such as user engagement, customer experience optimization, and automation of complex workflows. By appreciating how AI fits within larger technical landscapes, you position yourself to contribute meaningfully to multidisciplinary teams and initiatives.
Improving Processes With AI Insight
A foundational understanding of artificial intelligence also opens the door to improving business processes through data‑driven insight. Professionals who explore methodologies such as Six Sigma, as discussed in the Six Sigma Certification Training, focus on systematic improvement and quality management. Similarly, AI‑900 equips learners with tools to identify patterns, automate decisions, and generate insights that enhance process efficiency. For instance, predictive models can forecast demand fluctuations, while language processing services can automate document classification, reducing manual workload and improving accuracy. Learning to align AI services with process improvement goals helps you think critically about where AI adds value and how it can support continuous improvement initiatives.
Integrating AI into process workflows requires an understanding of both the technology and the business context, a dual perspective that AI‑900 fosters. As organizations increasingly adopt AI for operational excellence, professionals with foundational AI knowledge are better equipped to lead data‑informed initiatives that deliver measurable results across functions.
Enhancing Collaboration Through Intelligent Tools
In modern workplaces, collaboration and communication tools are integral to productivity, and understanding how AI enhances these tools enriches your practical perspective. For instance, professionals investigating certification options might explore like Slack Certification Training, which examines how teams optimize communication platforms for effective collaboration.
Bridging this domain with AI‑900 concepts shows how intelligent services can augment collaboration tools through capabilities such as automated summarization of conversations, context‑aware notifications, and integration of AI bots for task reminders. By studying foundational AI concepts alongside collaboration platforms, learners gain a sense of how intelligent systems fit into everyday work environments. This contextual understanding prepares you not just to pass an exam but to envision how Azure AI services enhance productivity, streamline workflows, and support team success. Preparing for certification thus becomes an exploration of how AI enriches technology ecosystems rather than a narrowly technical exercise.
Connecting Mathematics and Creativity to AI Fundamentals
Finally, appreciating the human side of technology brings depth to your AI learning journey. Exploring creative intersections between mathematics and culture, such as The Top 10 Most Memorable Math‑Themed Google Doodles, highlights how mathematical principles can be celebrated and visualized in engaging ways. These artistic interpretations remind learners that foundational AI concepts—rooted in probability, logic, and optimization—are not abstract but tied to human creativity and problem solving. Recognizing the beauty and utility of mathematical thinking helps demystify topics such as model training, statistical interpretation, and algorithmic behavior, making them more approachable. When you connect mathematical foundations to creative applications, AI concepts become more intuitive and engaging, reinforcing both confidence and curiosity. This broader perspective enriches your preparation, fostering a mindset that embraces complexity with enthusiasm and positions you to apply AI principles thoughtfully and innovatively.
Understanding Data Engineering’s Role in AI
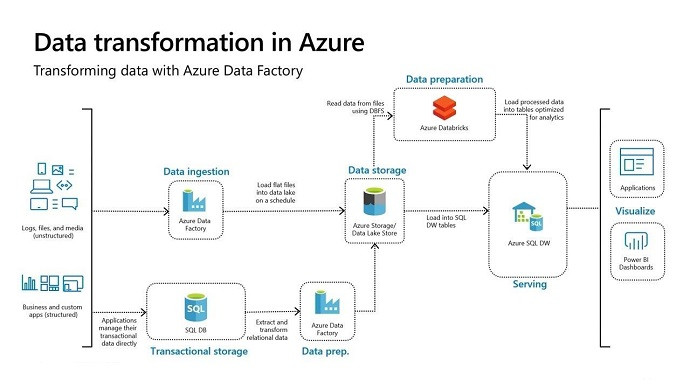
Understanding data engineering provides indispensable context for anyone preparing for AI‑900, because AI solutions are fundamentally data‑driven. Data engineering is the discipline of collecting, transforming, storing, and making data available for analytics and intelligent applications. When preparing for foundational AI knowledge on Azure, recognizing the significance of efficient, reliable data pipelines is critical. For example, the What Is Google Professional Data Engineer Certification? outlines the competencies required to collect, process, and analyze data at scale, which directly aligns with how AI models ingest and learn from data. Although the focuses on Google’s certification ecosystem, the underlying principles apply broadly: data quality, data integration, and system architecture matter greatly when building usable AI applications. In the context of Azure AI Fundamentals, you learn how services such as Azure Machine Learning and Cognitive Services expect structured and unstructured data to be formatted and parsed.
Machine learning models rely on well‑organized datasets to extract patterns and infer insights, and data engineers ensure that data flows seamlessly from source systems to AI modules while preserving integrity and performance. When you reflect on the requests for clean, labeled datasets in AI coursework, you begin to see how data engineers mitigate pitfalls like inconsistent formats, missing values, and duplicate records that can skew model behavior. Likewise, understanding data storage solutions such as Azure Data Lake or SQL databases helps you conceptualize how AI services access and interact with data repositories. By learning from a data engineer’s perspective, you build empathy for the infrastructure that supports AI workflows and deepen your ability to reason about real‑world AI implementation challenges. Preparing for foundational AI knowledge thus becomes not only a matter of understanding cognitive services but also appreciating the data foundations that make AI systems reliable, scalable, and trustworthy.
Career Pathways and Broader Skill Recognition
Developing a strong foundation in AI opens doors to dynamic career pathways, but it also helps to understand how complementary competencies reinforce professional growth. For example, the Top Google Career Certificates presents a range of credentials that employers value, including data analytics, UX design, project management, and IT support. While this list highlights opportunities in the Google ecosystem, its overarching message is universal: diversified knowledge builds resilience and adaptability in your career. When you are preparing for AI‑900, you are essentially building fluency in a language that intersects many disciplines — from data and cloud services to user experience and ethical considerations. By appreciating how AI integrates with other domains, you gain a nuanced understanding of how to contextualize your skills in broader business and technology landscapes.
For instance, having a baseline comprehension of user experience principles gives you insight into how AI‑powered interfaces, such as chatbots or recommendation systems, need to be designed to meet real user expectations. Similarly, understanding project management fundamentals helps you anticipate resource constraints and stakeholder needs when developing AI solutions. When you view your AI‑900 certification as part of a larger ecosystem of competencies, you position yourself not just as an AI practitioner but as a versatile professional who can bridge technological and operational goals. Embracing this perspective not only enhances your certification journey but also equips you to articulate your value proposition clearly to employers and collaborators.
Core IT Fundamentals and AI Synergy
A solid grasp of basic IT principles underpins many AI‑900 concepts, especially those related to computing infrastructure, software interoperability, and system performance. The FC0‑U71 provides insight into what is covered in foundational IT certification exams, including hardware fundamentals, software troubleshooting, and understanding operating systems. Although this link refers to a certification that is not directly tied to AI, the relevance to AI‑900 preparation is significant because many AI services are deployed within cloud ecosystems that require IT literacy. Knowing how operating systems manage memory, how software dependencies affect application behavior, and how network configurations impact service accessibility enhances your ability to architect, troubleshoot, and optimize AI workloads in a cloud environment.
Consider, for example, an Azure virtual machine running a data preprocessing pipeline before feeding data to a machine learning model. Understanding how the operating system allocates CPU and memory resources enables you to anticipate performance bottlenecks and proactively design for scalability. Likewise, familiarity with basic troubleshooting techniques helps you isolate issues when an AI service integration fails because of permissions or environment misconfigurations. When foundational IT knowledge complements your AI learning path, you become better equipped to navigate technical challenges holistically rather than addressing them in isolation.
Networking Fundamentals in AI Workloads
Networking fundamentals play an understated but essential role in AI workloads, especially when services span multiple systems and data sources. The N10‑009 provides an overview of networking concepts, including network protocols, routing, switching, and security basics — all of which impact how AI services communicate within and across cloud boundaries. For AI‑900 candidates, understanding these concepts helps demystify how AI modules send and receive data, how network security controls influence data access, and why latency matters when deploying real‑time AI applications like conversational bots or image classification endpoints.
For example, when an AI service like Azure Cognitive Services processes text or image data, that service may need to communicate with a storage account, a database, or an API endpoint. Understanding how secure network paths are established and how firewalls or routing rules affect these interactions ensures that you can design solutions that are both responsive and compliant. In real‑world deployments, network misconfigurations are often a source of performance issues or security vulnerabilities, and being able to reason about them empowers you to build resilient AI architectures. Thus, networking fundamentals enrich your AI‑900 preparation by helping you connect service behavior with infrastructure mechanics.
Cloud Fundamentals and Professional Certification Synergy
Beyond basic IT and networking, cloud fundamentals are crucial for AI applications deployed in modern environments. The PK0‑005 covers essential knowledge related to cloud platforms, virtualization, and service models, offering insight into how professionals conceptualize cloud service offerings. Although this link pertains to a specific certification exam, the broader concepts are deeply relevant to AI‑900. Azure AI services themselves are part of a cloud ecosystem, leveraging Platform as a Service (PaaS) and Software as a Service (SaaS) models that abstract infrastructure complexity while providing scalable, on‑demand computing power.
When you understand how cloud services differ — for example, how IaaS (Infrastructure as a Service) gives you control over virtual machines while PaaS abstracts that control in favor of managed services — you are better positioned to appreciate why Azure AI services handle infrastructure concerns for you. This understanding allows you to focus on solution logic rather than managing servers, which is a cornerstone advantage of cloud‑native AI platforms. Furthermore, knowledge of service models enables you to reason about cost implications, deployment strategies, and service scaling, all of which feed into smarter architecture decisions and more efficient use of resources.
Risk Management Insight for Professional Growth
Risk awareness is an invaluable mindset for AI practitioners, particularly when working with AI services that influence critical decision‑making or sensitive data. The Risk Management Interview Questions and Best Answers offers real insights into how professionals think about identifying, assessing, and mitigating risks in technical environments. Although this interview guide is broader than AI alone, the competencies it highlights — such as analytical reasoning, scenario assessment, and proactive communication — are directly useful in AI‑900 preparation and practice. AI solutions often carry inherent risks related to fairness, bias, data privacy, and model reliability, and being able to articulate risk scenarios and mitigation strategies enhances both your certification readiness and your professional maturity.
When preparing for AI‑900, protecting data privacy by using appropriate consent protocols, auditing datasets for bias before training, and validating model recommendations against ethical benchmarks are all examples of risk‑aware practices. Integrating risk thinking into your study and solution design processes strengthens your ability to foresee challenges before they occur and helps you structure answers to exam questions in a way that demonstrates thoughtful, context‑aware reasoning. Whether it’s during an interview, a project review, or a certification exam, being able to address risk credibly reflects a higher level of competence that goes beyond technical facts.
Understanding Agile and Professional Growth
Being able to adapt quickly and manage iterative development cycles is another strength that AI professionals benefit from. Agile practices encourage flexibility, incremental progress, and cross‑functional collaboration — skills that mirror the iterative process of learning and improving AI models. How Much Does It Cost to Get PMI‑ACP Certified? highlights the value of Agile certification and also underscores the investment professionals make in continuous learning. While cost details are specific to that certification, the broader lesson is that certification journeys often require time, planning, and resource allocation — just like mastering AI fundamentals. Embracing Agile practices helps you structure your AI‑900 study schedule into sprints, set measurable objectives, review progress regularly, and adapt based on feedback or challenging topics.
Approaching AI learning iteratively improves retention and allows you to build confidence gradually. For instance, you might focus one week on machine learning definitions, the next on cognitive services, and the next on ethical AI considerations. Reflection sessions after practice exams help you identify weak areas and adjust your plan accordingly, mirroring how Agile teams conduct retrospectives to improve outcomes. This mindset reinforces resilience and self‑directed improvement — qualities that are valuable both in certification preparation and real AI project environments.
Security Fundamentals and AI Trustworthiness
Security remains a central concern when building and deploying AI systems, whether handling sensitive data or ensuring that intelligent services operate within compliance frameworks. The PT0‑002 provides a window into the principles of security fundamentals, covering topics such as authentication, access control, and threats and vulnerabilities. Integrating security awareness into your AI‑900 study reinforces the idea that intelligent solutions must not only be functional but also safe, compliant, and secure. For example, when using cognitive services to analyze user text or images, understanding how to apply proper authentication tokens, secure API keys, and role‑based access control protects both the data and the service from misuse.
Security also underpins trustworthiness — an essential attribute of AI solutions that users and stakeholders must believe in. Practices such as encrypting data at rest and in transit, monitoring access logs for anomalies, and adhering to privacy regulations all contribute to building trustworthy AI systems. Preparing for AI‑900 with a security lens enriches your understanding of how Azure AI services incorporate builtin safeguards and how you can leverage those features responsibly. By internalizing security principles alongside AI concepts, you position yourself to design solutions that are robust and respectful of ethical and legal expectations.
Advanced Security Practices and System Hardening
Building on general security knowledge, advanced security practices focus on how systems are hardened against threats and how organizations implement multi‑layered protections. The PT0‑003 delves into more detailed aspects of security implementation, including secure network design, intrusion detection, and endpoint protection. While this certification content may seem distant from foundational AI concepts, the underlying appreciation for layered defense applies directly to how AI systems are deployed and monitored. For example, when you create an AI workflow that accesses sensitive data, understanding secure network segmentation ensures that only authorized services communicate with that data. Similarly, monitoring telemetry from AI services can alert you to unusual usage patterns that might indicate a breach or misuse.
Integrating advanced security perspectives into your overall AI‑900 preparation fosters a mindset that values protection, oversight, and responsible innovation. This depth of understanding helps you articulate comprehensive solutions that go beyond answering exam questions to include operational awareness. Securing AI systems is not an afterthought; it is integral to building solutions that stakeholders trust and auditors verify.
Synthesizing Skills With Technical Standards
As you prepare for AI‑900, recognizing how technical standards guide professional expectations is valuable. The SK0‑005 presents topics related to industry standards, customer support, and service delivery expectations, which indirectly inform how practitioners engage with users, stakeholders, and quality assurance processes. Although this content pertains to a specific certification domain, its emphasis on meeting defined expectations and adhering to standards aligns with how AI systems are evaluated against performance, fairness, and usability benchmarks.
When preparing for AI‑900, understanding the importance of satisfying quality criteria — such as accuracy thresholds for predictions or ethical standards for AI use — equips you to think critically about how solutions perform in production. Standards also offer a common language among professionals, enabling you to communicate expectations clearly and evaluate work objectively. By integrating these broader professional perspectives into your AI‑900 journey, you cultivate a mindset that values precision, accountability, and alignment with business and ethical norms. This comprehensive approach strengthens your readiness for the exam and positions you as a thoughtful practitioner who understands not only how AI works but also why it matters in context.
Six Sigma Versus Lean Six Sigma in AI Context
Understanding process improvement methodologies provides a unique lens through which to approach AI. For instance, Which Is Better For You: Six Sigma Or Lean Six Sigma Certification? compares these two approaches to quality and efficiency management. Six Sigma focuses on reducing defects through statistical analysis, while Lean Six Sigma combines this approach with lean principles to eliminate waste and optimize workflows.
For AI‑900 candidates, the relevance lies in recognizing how AI can enhance these process improvement frameworks. AI services like predictive analytics and anomaly detection automate the identification of inefficiencies, support root cause analysis, and provide actionable insights that drive continuous improvement. By connecting AI capabilities to Lean Six Sigma objectives, you develop a mindset for using intelligent systems to optimize operations, identify bottlenecks, and measure outcomes quantitatively. This integration also reinforces the understanding that AI is not an isolated technology but a tool that enhances strategic decision-making and operational excellence.
Crucial Questions for Process Improvement and AI Integration
Many professionals preparing for certification exams benefit from understanding common industry questions that shape practical application. The 8 Crucial Questions Every Six Sigma Practitioner Wants Answered offers insight into challenges such as selecting metrics, measuring performance, prioritizing interventions, and sustaining process improvements. AI‑900 candidates can apply a similar framework by considering how AI tools answer operational questions, evaluate performance, and support decision-making. For instance, machine learning algorithms can identify patterns in historical data to forecast outcomes, while cognitive services can interpret unstructured text to reveal customer sentiment or operational anomalies. By approaching AI through the lens of these eight questions, learners develop a structured method to assess use cases, evaluate trade-offs, and implement AI solutions effectively.
The integration of AI with process improvement frameworks also teaches aspirants to anticipate limitations, understand confidence levels in predictions, and measure the impact of automated decisions. This approach enhances the ability to articulate the rationale behind AI recommendations, a skill highly valued in business and technical environments. By framing AI learning around questions that matter to practitioners, AI‑900 candidates cultivate a problem-solving mindset that bridges theoretical knowledge with operational execution. Preparing with this mindset encourages deeper comprehension, which enhances retention and builds the confidence necessary to navigate scenario-based questions on the AI‑900 exam.
Process Engineering Principles and AI Applications
A solid understanding of process engineering underpins the effective deployment of AI systems. The Process Engineer Role Overview: Primary Duties and Expectations provides a detailed view of responsibilities such as designing, monitoring, and optimizing workflows. AI‑900 candidates benefit from understanding these roles because AI is often deployed to support or automate aspects of complex processes. For example, a process engineer might design a workflow for supply chain optimization, and AI can analyze large datasets to recommend route adjustments, predict delays, or optimize inventory. This perspective helps candidates visualize how AI solutions interact with established operational roles, making it easier to translate exam scenarios into real-world applications.
By studying process engineering alongside AI fundamentals, learners develop a dual perspective that combines domain knowledge with technological capability. They learn to recognize how data-driven insights can streamline workflows, minimize waste, and enhance decision-making efficiency. Understanding these connections also reinforces the importance of data quality, process mapping, and continuous monitoring, which are foundational concepts in AI deployment. This broader contextual knowledge allows AI‑900 candidates to approach exam questions with clarity, reasoning not only about technical correctness but also about operational impact, which is essential for mastering the certification.
Salesforce Omnistudio for Enterprise AI Solutions
Salesforce applications are widely used in enterprises to streamline operations, and understanding these platforms complements AI knowledge. The Salesforce Certified Omnistudio Consultant Certification highlights the role of consultants in designing scalable, customizable Salesforce solutions. AI‑900 learners can draw parallels in how Azure AI services enhance enterprise platforms, such as integrating predictive analytics into CRM systems to forecast customer churn or recommending targeted campaigns. Consulting expertise emphasizes scenario-based problem solving, aligning with the approach needed to interpret AI service capabilities in real-world contexts.
Similarly, the Salesforce Certified Omnistudio Developer Certification focuses on implementing Omnistudio applications, emphasizing coding, configuration, and workflow automation. AI‑900 candidates benefit by seeing how technical solutions translate into tangible business benefits, such as automating decision-making or optimizing engagement processes. These examples reinforce the practical mindset required to solve AI‑related scenarios, ensuring that theoretical concepts are connected to actionable outcomes.
Salesforce Service Cloud and Customer-Centric AI
The Salesforce Certified Service Cloud Consultant Certification illustrates how AI can enhance customer service by automating responses, triaging support tickets, and providing actionable insights for agents. AI‑900 candidates learn similar principles when exploring Azure AI services, such as QnA Maker for building question-answering systems or sentiment analysis to gauge customer satisfaction. Studying these applications highlights the importance of designing AI solutions that are user-centric and aligned with organizational objectives, reinforcing the exam's emphasis on practical understanding rather than rote memorization.
Network Security and AI Deployment
A strong foundation in cybersecurity is essential for responsible AI deployment. The PCNSA Palo Alto resource focuses on firewall management, secure network configuration, and threat prevention. For AI‑900 candidates, these principles translate into understanding how Azure AI services interact with networks, manage data securely, and comply with organizational policies. Knowledge of security fundamentals ensures that AI models and endpoints are deployed in ways that protect sensitive information and maintain trustworthiness, aligning with ethical and compliance requirements emphasized in the AI‑900 exam.
Supply Chain Management and AI Integration
AI has transformative potential in supply chain management, helping organizations forecast demand, optimize logistics, and automate decision-making processes. The Comprehensive Guide to Supply Chain Management: Varieties, Advantages, and Functionality explains the types of supply chains, such as lean, agile, and hybrid, and emphasizes how integration across suppliers, manufacturers, distributors, and customers drives efficiency. Azure AI services can analyze large-scale operational data to predict potential disruptions, optimize inventory levels, and recommend resource allocation. For example, predictive analytics can forecast fluctuations in demand, allowing lean supply chains to maintain minimal inventory without risking shortages. Agile supply chains can leverage AI to respond quickly to market changes or supplier delays, while hybrid models balance flexibility and efficiency by using data-driven insights to optimize processes. Understanding these applications helps AI‑900 candidates contextualize machine learning and cognitive services, illustrating how AI provides tangible business value and reinforcing the ability to solve scenario-based problems in the exam.
Statistical Process Control and Quality Monitoring
Ensuring reliability and consistent performance is essential in AI deployment, and statistical process control (SPC) is a key methodology for monitoring processes. The Complete Guide to SPC Charts: What They Are, When to Use Them, and How to Build Them details how SPC charts track process variations, detect anomalies, and guide corrective actions. For AI‑900 learners, this is analogous to monitoring machine learning model outputs, validating predictions, and ensuring accuracy. AI models require constant observation to ensure they produce consistent, reliable results, and understanding SPC principles provides a structured way to interpret deviations and take corrective action.
For example, a predictive maintenance model monitoring factory equipment can detect when performance metrics fall outside expected ranges, triggering alerts for intervention. Incorporating SPC analysis into AI operations also encourages data-driven decision-making, emphasizing the need to quantify model accuracy, error rates, and confidence levels. By applying these principles, AI‑900 candidates can better understand scenario-based questions that ask them to evaluate AI outputs or troubleshoot anomalies. This analytical mindset strengthens comprehension of AI service performance monitoring, ensures adherence to quality standards, and provides practical skills applicable to both the certification exam and professional AI deployments.
Cybersecurity Fundamentals and AI
Security is a critical consideration when deploying AI in professional environments. The SY0‑701 covers core cybersecurity principles such as risk assessment, access control, and threat mitigation, which are relevant to AI‑900 preparation. Azure AI services often process sensitive data, and understanding how to secure this information ensures compliance with organizational policies and ethical standards. For example, AI applications handling customer or financial data must use encrypted storage, secure access protocols, and monitored endpoints to prevent unauthorized access.
AI‑900 candidates must understand the relationship between data security and service functionality. Knowledge of cybersecurity fundamentals enables learners to anticipate vulnerabilities in AI workflows, protect sensitive datasets, and design compliant solutions. In real-world scenarios, these principles ensure that AI-driven recommendations remain reliable and confidential. Integrating security awareness into AI preparation also fosters ethical considerations, emphasizing responsible AI deployment, and reinforcing scenario-based reasoning for the exam.
IT Administration and Cloud Fundamentals
A solid understanding of IT administration supports AI deployment by ensuring cloud and infrastructure resources are optimized and properly configured. The TK0‑201 and XK0‑005 cover topics such as system configuration, cloud services, networking, and troubleshooting, which are indirectly applicable to AI‑900 preparation. Knowledge of these principles helps candidates understand how Azure AI services operate within a cloud environment, including storage, virtual machines, and network connectivity.
For instance, deploying a machine learning model may involve configuring compute resources, setting up secure storage for datasets, and establishing service endpoints. IT literacy ensures AI‑900 learners can reason about these components, anticipate performance bottlenecks, and plan scalable deployments. This practical perspective enhances scenario-based learning, helping candidates understand the underlying infrastructure that supports AI solutions. By integrating IT administration concepts, learners gain confidence in reasoning about service interactions and cloud operations, which is crucial for both the exam and real-world applications.
Advanced Network Security and AI Systems
Network security extends beyond basic administration to include advanced protective measures. The PCSAE Palo Alto covers secure network design, intrusion prevention, and firewall management. AI‑900 candidates can connect these principles to securing AI deployments, ensuring that models, endpoints, and data streams are protected from unauthorized access and vulnerabilities. For example, AI solutions that interact with external APIs or IoT devices require secure communication channels and identity management protocols.
Integrating advanced security practices ensures that AI systems maintain confidentiality, integrity, and availability. Understanding how to configure firewalls, monitor network traffic, and implement endpoint protections prepares learners to evaluate AI deployment scenarios critically. By embedding security knowledge into AI workflows, candidates gain insight into operational risks and mitigation strategies, reinforcing practical reasoning skills that are evaluated in scenario-based exam questions.
Project Management and AI Deployment
Project management competencies enhance AI readiness by providing structured approaches to planning, execution, and performance evaluation. Courses such as PeopleCert 102, PMI CAPM, and PgMP emphasize methodology, lifecycle management, and stakeholder engagement. AI‑900 candidates can apply these principles by planning AI initiatives, coordinating with cross-functional teams, and ensuring alignment with organizational goals.
For example, deploying an AI-based customer support system involves defining objectives, scheduling data collection and model training, collaborating with IT and business teams, and monitoring post-deployment performance. Using project management frameworks ensures that tasks are structured, dependencies managed, and outcomes measurable. Integrating these methodologies strengthens scenario-based reasoning, enabling learners to apply AI knowledge strategically and holistically, rather than as isolated technical concepts.
Career Planning and Certification Value
Understanding the career impact of certifications provides motivation and strategic insight for AI‑900 candidates. The Highest Paying IT Certifications: Unleashing Lucrative Career Opportunities highlights emerging IT credentials, including cloud, cybersecurity, and AI-focused certifications. AI‑900 serves as a foundation for advanced Azure certifications, AI engineer roles, and data science opportunities, positioning candidates for high-value careers in technology.
By linking certification outcomes to career growth, learners can plan their development trajectory, prioritize learning, and align certification efforts with long-term goals. AI‑900 knowledge opens doors to roles in AI solution deployment, predictive analytics, and cloud integration. Combining certification awareness with practical skills ensures that learners not only succeed on the exam but also position themselves competitively in the technology job market.
Supply Chain Careers and AI Opportunities
AI plays an increasingly critical role in modern supply chains, influencing operational efficiency, predictive analytics, and strategic decision-making. The ASCM Salary and Career Insights for the Supply Chain Industry provides valuable context about compensation trends, career opportunities, and skills in demand. AI‑900 candidates can connect these insights to how AI and automation improve supply chain processes. For example, predictive models can forecast inventory demand, detect inefficiencies, and optimize routing logistics. By understanding the intersection of AI and supply chain careers, learners can appreciate the practical impact of Azure AI services in enterprise operations, linking certification knowledge to professional relevance.
Integrating AI into supply chain management also highlights the strategic value of data-driven decision-making. Professionals who combine supply chain expertise with AI skills can analyze trends, simulate scenarios, and automate repetitive tasks, improving accuracy and efficiency. This perspective strengthens AI‑900 preparation by encouraging candidates to think beyond technical implementation, understanding how AI solutions contribute to organizational goals and career growth. Recognizing the economic and professional context of AI skills empowers candidates to approach scenario-based exam questions with a real-world mindset, bridging theory and practice effectively.
Artificial Intelligence Career Planning
Understanding career pathways for AI professionals helps contextualize AI‑900 learning objectives. The Artificial Intelligence Career Guide: Your Path to Becoming an AI Expert outlines skill requirements, roles, and growth opportunities for AI practitioners. AI‑900 provides foundational knowledge that underpins higher-level AI competencies, including data analysis, machine learning, and cognitive service implementation. By studying AI career trajectories, learners can identify skills to prioritize, plan for future certifications, and position themselves for roles such as AI engineer, data analyst, or cloud solutions specialist.
For instance, AI‑900 candidates gain exposure to Azure AI fundamentals, which can be complemented by advanced certifications in machine learning or cloud computing. Understanding the professional context reinforces why certain concepts are emphasized in the exam and encourages strategic study practices. Additionally, career guidance helps learners connect AI capabilities with organizational needs, ensuring that AI solutions are practical, ethical, and aligned with business objectives. By merging career planning with technical learning, candidates strengthen both their exam readiness and their long-term professional prospects.
Project Management and AI Implementation
Project management frameworks play a crucial role in the structured deployment of AI solutions. The PMP Project Management Professional course emphasizes planning, execution, monitoring, and risk mitigation, which directly relate to implementing AI workflows. AI‑900 candidates can apply these principles when orchestrating model training, deploying Azure AI services, or integrating cognitive services into operational processes.
Structured project management ensures that AI initiatives remain aligned with organizational goals, deadlines, and resource constraints. For example, deploying a predictive maintenance model requires careful planning for data collection, preprocessing, model evaluation, and system integration. Using project management principles ensures tasks are sequenced efficiently, dependencies managed, and outcomes measured objectively. By integrating these skills into AI‑900 preparation, candidates cultivate analytical, organizational, and strategic reasoning abilities, which are essential for solving scenario-based exam questions that simulate real-world AI deployment challenges.
Similarly, understanding the PRINCE2 Foundation methodology reinforces structured approaches to AI deployment, emphasizing defined roles, controlled stages, and quality management. These frameworks help candidates conceptualize how AI initiatives are executed within professional environments, encouraging them to consider risk, resources, and quality alongside technical implementation. By combining AI fundamentals with project management knowledge, learners develop a holistic understanding of how Azure AI services operate within structured organizational processes.
Risk Management Certifications and AI Strategy
Risk awareness is essential in AI solution design, as intelligent systems can introduce operational, ethical, or security vulnerabilities. The Top Risk Management Certifications to Elevate Your Career emphasizes the value of developing competencies in risk assessment, mitigation, and compliance. AI‑900 candidates benefit from understanding risk frameworks because they provide insight into evaluating AI decisions, ensuring fairness, and protecting sensitive data.
For example, when deploying machine learning models for customer interactions, assessing bias, monitoring performance, and implementing safeguards are essential steps. Risk management knowledge equips learners to anticipate unintended outcomes, communicate potential challenges, and design mitigations effectively. This approach also strengthens scenario-based reasoning for the exam, as candidates must consider operational, ethical, and security dimensions when proposing AI solutions. Integrating risk awareness into AI preparation ensures that learners are not only technically proficient but also strategically and ethically informed.
IT Certification Strategy for AI Professionals
Understanding broader IT certification trends helps candidates align AI‑900 preparation with professional growth. The Best IT Certifications : Top Choices for Career Growth highlights emerging certifications in cloud computing, cybersecurity, and AI, providing a roadmap for career advancement. AI‑900 serves as a foundational credential that can be complemented by higher-level certifications in Azure, data science, or AI engineering.
For example, candidates who combine AI‑900 with certifications in cloud architecture or advanced machine learning are well-positioned for roles involving Azure AI deployment, predictive analytics, and intelligent automation. Understanding the professional landscape helps learners prioritize skills, select complementary certifications, and plan career trajectories strategically. This awareness also reinforces the value of AI‑900 in building credibility, opening opportunities, and developing transferable skills applicable to multiple IT domains.
Cloud Fundamentals and Advanced Concepts
Cloud architecture knowledge is crucial for understanding how AI services operate in scalable and flexible environments. The XK0‑006 covers cloud computing fundamentals, including infrastructure, storage, networking, and service models. For AI‑900 candidates, grasping these concepts enhances understanding of how Azure AI services manage compute resources, process data, and integrate with other cloud services.
Similarly, the CCAAK highlights application development in cloud environments, emphasizing automation, deployment, and resource orchestration. Combining cloud architecture knowledge with AI fundamentals helps candidates reason about model deployment, scaling, and maintenance within Azure environments. Understanding cloud services also strengthens scenario-based problem solving for the AI‑900 exam, as candidates can evaluate solutions from both a technical and architectural perspective.
Function as a Service and Cloud Deployment
Emerging cloud paradigms, such as serverless computing, are increasingly relevant for AI applications. The FaaS Function as a Service: A Simplified Approach to Cloud Computing bexplains how serverless architectures allow developers to execute code without managing infrastructure. AI‑900 candidates benefit from understanding how Azure Functions or similar FaaS services can host AI workloads, handle event-driven tasks, and scale automatically.
For example, a text analysis AI model could be triggered by incoming data streams via FaaS, processing each message without requiring persistent servers. This approach demonstrates how cloud paradigms simplify deployment while maintaining scalability and efficiency. Understanding FaaS also helps learners conceptualize cost management, resource optimization, and dynamic scaling, all of which are useful for exam scenarios and practical AI deployments.
Hypervisors and Cloud Virtualization
Virtualization remains foundational in cloud AI deployment. The Role of Hypervisors in Cloud Computing: Types and Functions Explained discusses hypervisor types, virtual machine management, and resource allocation. AI‑900 candidates can relate this to how Azure provisions virtual machines, containers, and managed services for AI workloads. Understanding hypervisors clarifies the abstraction between physical hardware and cloud services, reinforcing why AI services can scale without direct infrastructure management.
For instance, machine learning training jobs require dynamic resource allocation, which hypervisors manage behind the scenes. By understanding these principles, learners can better reason about performance considerations, deployment architecture, and resource optimization in Azure AI scenarios. This knowledge complements AI‑900 concepts and prepares candidates for practical questions involving service architecture, model deployment, and scaling considerations.
Cloud Computing Expertise and Certification
Building a strong foundation in cloud computing is essential for IT professionals who aim to design, deploy, and manage scalable enterprise solutions. Understanding cloud service models, virtualization, and resource orchestration enables organizations to efficiently allocate compute, storage, and networking resources while maintaining resilience and agility. Many professionals turn to the XK0‑005 to structure their learning around core cloud concepts, including deployment strategies, automation, and hybrid cloud integration. These resources allow learners to gain practical knowledge of cloud platform functionality, architecture patterns, and management practices that are essential in real-world environments. By studying cloud fundamentals and preparing with targeted materials, candidates can ensure they understand both theoretical and applied aspects of cloud solutions. This knowledge is vital for making informed decisions when designing, monitoring, and optimizing cloud services for performance, cost efficiency, and security, positioning IT professionals for success in a rapidly evolving technological landscape.
Foundational Project Management Skills
Project management is a critical skill set for coordinating team efforts, managing resources, and ensuring that deliverables align with organizational objectives. Professionals who want to establish a solid foundation in structured project approaches often pursue the PMI CAPM certification, which emphasizes project lifecycle management, risk assessment, and communication strategies. By mastering these principles, candidates can plan tasks, monitor progress, and address challenges proactively, reducing the likelihood of delays or budget overruns. The CAPM framework teaches the application of methodologies such as Agile, Waterfall, and hybrid approaches to real-world projects, helping learners balance scope, schedule, and cost. This foundational knowledge prepares IT and business professionals to work effectively within diverse teams, manage stakeholder expectations, and deliver high-quality outcomes. Furthermore, CAPM-certified individuals gain confidence in handling scenario-based challenges, which is essential for project-oriented career progression and leadership opportunities.
Program Management for Strategic Leadership
Program management requires an advanced perspective that extends beyond individual projects to overseeing multiple interrelated initiatives that contribute to strategic goals. The PgMP certification equips professionals with skills in portfolio alignment, risk mitigation, resource coordination, and performance measurement. By mastering program management principles, candidates learn to ensure that all projects within a program contribute to organizational objectives while managing constraints, interdependencies, and changing priorities. PgMP holders understand how to evaluate success metrics, forecast outcomes, and maintain accountability at a strategic level. This skill set is crucial for professionals managing large-scale programs where complexity, risk, and resources require careful balancing. Additionally, program management knowledge enhances the ability to integrate technical solutions, including AI and cloud deployments, with business objectives, ensuring that initiatives are not only operationally effective but also aligned with long-term organizational goals, creating measurable value and impact.
Advanced Cloud Architecture
Cloud architecture knowledge is fundamental for designing reliable, scalable, and efficient cloud-native applications. Professionals preparing for credentials such as the CCAAK gain insights into advanced cloud design patterns, service integration, and optimization strategies that ensure high availability and fault tolerance. These resources cover important concepts such as microservices, distributed systems, and data lifecycle management, providing learners with a holistic understanding of cloud infrastructure and solution design. By mastering advanced cloud architecture, candidates learn how to integrate diverse services, automate deployments, and implement best practices for security, compliance, and performance monitoring. This knowledge enables professionals to make informed decisions when selecting tools, designing workflows, and scaling applications in dynamic environments. Furthermore, understanding cloud architecture principles helps bridge the gap between development, operations, and business requirements, ensuring that cloud solutions meet both technical specifications and organizational needs effectively.
Data Architecture and Governance
Effective data architecture and governance are crucial for organizations that rely on accurate, secure, and accessible data to drive decision-making. The Certified Data Architect certification focuses on designing efficient data models, managing metadata, and ensuring alignment between technical solutions and business objectives. Professionals gain expertise in data lifecycle management, schema design, and the implementation of governance frameworks that promote data quality and compliance. By mastering these concepts, candidates can enable analytics, machine learning, and AI initiatives to function reliably and deliver actionable insights. Data architects also ensure that enterprise systems are designed for scalability and adaptability, facilitating the integration of new technologies and evolving organizational needs. Strong knowledge in this domain allows IT professionals to bridge the gap between raw data and strategic insights, supporting decision-making processes while maintaining data security, integrity, and accessibility.
Marketing Cloud and Customer Engagement
In today’s digital economy, organizations rely heavily on targeted marketing campaigns and personalized customer interactions to remain competitive. The Salesforce Certified Marketing Cloud Email Specialist credential equips professionals with the ability to manage subscriber data, design email campaigns, and analyze engagement metrics effectively. This certification emphasizes automation, segmentation, and campaign optimization, enabling candidates to implement data-driven marketing strategies that enhance customer retention and increase conversion rates. By understanding platform-specific capabilities and best practices, professionals can create campaigns that are both measurable and scalable. This expertise not only improves marketing effectiveness but also strengthens analytical and strategic thinking skills, which are valuable when evaluating campaign performance and making informed recommendations. Professionals with this knowledge can bridge the gap between technical execution and business strategy, ensuring that marketing efforts align with broader organizational goals.
Platform Application Development
Creating custom applications on enterprise platforms requires both technical proficiency and strategic insight to meet unique business needs. The Salesforce Certified Platform App Builder certification focuses on designing data models, implementing business logic, creating responsive interfaces, and ensuring secure deployment of applications. Candidates learn to build solutions that extend core platform functionality, automate workflows, and enhance operational efficiency. Mastery of these skills allows professionals to develop applications that are scalable, maintainable, and aligned with organizational objectives. Additionally, understanding declarative and programmatic tools empowers candidates to solve complex business problems while adhering to best practices for data integrity and user experience. Platform App Builder knowledge also strengthens the ability to integrate AI, analytics, and automation into business applications, demonstrating the practical application of technical skills in real-world scenarios.
Conclusion
The journey toward mastering AI, cloud computing, and professional certifications is both challenging and rewarding, requiring a comprehensive understanding of technology, strategy, and organizational objectives. A clear theme emerges: technical expertise alone is insufficient without strategic, operational, and career-oriented perspectives. Professionals seeking to excel in roles involving Azure AI, Salesforce platforms, cloud architecture, and data management must develop a multidimensional skill set that integrates practical implementation knowledge with planning, governance, and industry best practices. By pursuing certifications such as XK0‑005, PMI CAPM, PgMP, CCAAK, Certified Data Architect, Salesforce Certified Marketing Cloud Email Specialist, and Salesforce Certified Platform App Builder, learners validate not only technical competencies but also their ability to align these skills with business objectives, team collaboration, and organizational outcomes.
One key insight from this discussion is the interconnectedness of technical and managerial knowledge. Cloud certifications like XK0‑005 provide foundational knowledge on virtualization, resource orchestration, and scalable architecture, ensuring professionals can design and manage reliable cloud services. When combined with project and program management skills demonstrated through PMI CAPM and PgMP certifications, candidates gain the ability to coordinate complex initiatives, allocate resources efficiently, mitigate risks, and ensure that technical deployments align with broader organizational strategies. This combination empowers professionals to handle not just the implementation of AI and cloud solutions but also the planning, execution, and monitoring of projects that deliver measurable business value. Data architecture and governance also emerge as a central theme in career progression.
Certifications like Certified Data Architect equip learners to model data effectively, manage metadata, and enforce governance frameworks, which are critical for enabling analytics, machine learning, and AI initiatives. Data integrity, accessibility, and security are not just technical concerns—they directly impact decision-making and strategic outcomes in organizations. Professionals who master these skills are uniquely positioned to bridge the gap between raw data and actionable insights, supporting enterprise initiatives that rely on accurate and timely information. Platform-specific certifications, such as Salesforce Certified Marketing Cloud Email Specialist and Salesforce Certified Platform App Builder, further demonstrate the importance of combining domain-specific expertise with technical skills. These credentials emphasize not only tool proficiency but also the ability to apply data-driven decision-making, campaign optimization, and custom application development in ways that deliver tangible organizational benefits.
Candidates trained in these platforms can integrate AI-powered analytics, automate workflows, and implement scalable business solutions, highlighting how technical certifications translate into real-world business outcomes. Another essential insight is the role of continuous learning and certification planning in career growth. The technology landscape evolves rapidly, particularly in AI, cloud computing, and data management. Professionals who strategically pursue complementary certifications develop both breadth and depth of knowledge, positioning themselves as versatile and adaptable contributors. Combining cloud, AI, data architecture, and project management knowledge ensures that candidates are not only proficient in individual areas but also capable of designing and implementing integrated solutions that address organizational challenges comprehensively. The integration of AI fundamentals, cloud architecture, data governance, marketing and platform-specific expertise, and structured project management provides a robust roadmap for professional and career development.
Achieving certifications in these areas demonstrates technical mastery, strategic thinking, and operational competence, creating a compelling value proposition for employers. For individuals pursuing Azure AI, Salesforce platforms, or cloud and data-focused roles, this holistic approach prepares them to contribute meaningfully to organizational objectives, deliver efficient solutions, and remain competitive in the fast-evolving technology sector. By combining knowledge, skills, and strategic insights, professionals can maximize the impact of AI and cloud technologies, translate technical learning into practical outcomes, and achieve sustained career growth. Mastery of these domains equips candidates with the confidence, credibility, and capability to succeed not only in certification exams but also in real-world applications, reinforcing the critical role of continuous learning, integration, and practical application in shaping a successful professional trajectory.
Prepared by Top Experts, the top IT Trainers ensure that when it comes to your IT exam prep and you can count on ExamSnap Microsoft Azure AI Fundamentals certification video training course that goes in line with the corresponding Microsoft AI-900 exam dumps, study guide, and practice test questions & answers.
Purchase Individually


Microsoft Training Courses






















Only Registered Members can View Training Courses
Please fill out your email address below in order to view Training Courses. Registration is Free and Easy, You Simply need to provide an email address.
- Trusted by 1.2M IT Certification Candidates Every Month
- Hundreds Hours of Videos
- Instant download After Registration


