Use VCE Exam Simulator to open VCE files

This Chapter covers following Topic Lessons
This Chapter covers following Lab Exercises
In this chapter we will add Virtual Machines Scale Set (VMSS) to the topology. VMSS will be created in Web-Subnet of Virtual Network VNETCloud.
Virtual Machine Scale Sets creates scalable & high available Virtual Machine infrastructure by deploying and managing identical VMs as a set in a single Subnet of Virtual Network. An Azure Load Balancer or Azure Application Gateway is also deployed along with set of identical VMs.
Scale sets provide high availability to your applications, and allow you to centrally manage, configure, and update a large number of VMs. With virtual machine scale sets, you can build large-scale services for areas such as compute, big data, and container workloads.
VMs in the scale set are managed as a unit. All VMs in the scale set are identical and are either Windows VM or Linux VMs. All VMs are of same size and series.
VMSS supports Azure Windows and Linux images and Custom images.
Optionally by enabling Autoscaling on VMSS, Virtual Machines instances in the set can be added or removed automatically.
Identical VMs deployed as a set.
Easy to create and manage multiple VMs.
Provides high availability and application resiliency.
Allows your application to automatically scale as resource demand changes.
Works at large-scale.
Virtual Machine Scale Set (VMSS) deploys set of Identical VMs in a single subnet of a Virtual Network. Figure below shows Architecture of Virtual Machine Scale Set (VMSS) deployed in single subnet with Single Placement group.
Set of identical VMs are deployed in the Single Subnet of Virtual Network.
You can select Existing or create new Virtual Network with Single Subnet during VM Scale set deployment.
Azure Load Balancer or Application Gateway with Public IP is created during VMSS deployment.
Placement group is availability set with five fault domains and five update domains and support up to 100 VMs. Placement group is automatically created by VMSS. Additional Placement groups will be automatically created by VMSS if you are deploying more than 100 instances.
Storage: VMSS can use managed disks or unmanaged disks for Virtual Machine storage. Managed disks are required to create more than 100 Virtual Machines. Unmanaged disks are limited to 100 VMs and single Placement Group.
With Autoscaling, Virtual Machines can be added (scale-out) or removed (scale-in) automatically from Virtual Machine Scale Set (VMSS) based on rules configured for metrics (CPU utilization, Memory utilization, Storage Queue etc.).
During Autoscaling the application continues to run without interruption as new resources are provisioned. When the provisioning process is complete, the solution is deployed on these additional resources. If demand drops, the additional resources can be shut down cleanly and de-allocated automatically.
You can enable Autoscaling during VMSS creation or after the creation from VMSS dashboard or Azure Monitor Dashboard. If enabled during VMSS creation then only CPU metrics can be used for Autoscaling. Autoscaling can be based on schedule or on metric condition. Metrics can be derived locally from VMSS or externally from Azure Resources such Service Bus, Storage Queue etc.
Autoscaling is enabled by configuring rules on Metrics or on Schedule. VMSS supports following types of metrics for configuring Autoscaling rules:
Host level Metrics: Host level metrics such as % CPU Utilization, Disk Read/write, Network in/out traffic at Network interface etc are emitted by Virtual Machines by default.
Guest OS level Metrics: You need to enable Guest OS diagnostics to use OS level metrics. OS level metrics are Operating system performance counters. Performance metrics are collected from inside of each VM instance and are streamed to an Azure storage account. VMSS can configure Autoscaling rules based on Guest OS level metrics,.
Application Insights: Application insights provide performance data for application running on VM.
Azure Resources: Azure resources such as Azure Storage queue can be used as a metric for configuring Autoscaling rules. For Example you can configure Autoscaling rule which scale-out by 2 instances when Storage Queue length is greater than 5.
When threshold for a metric is reached scale-out or scale-in happens. For Example a rule configured for CPU utilization states that if CPU utilization crosses 80% then scale-out by 2 instances and if CPU utilization drops below 30% then scale-in by one instance.
All thresholds are calculated at an instances level (Average of all instances in VMSS). For example scale- out by 2 instance when average CPU > 80%, means scale-out happens when the average CPU across all instances is greater than 80%.
Design Nugget : If Multiple Rules are configured then scale-out happens if any rule is met and scale-in happens when all rules are met.
Design Nuggets : You can only attach data disks to a scale set that has been created with Azure Managed Disks.
Design Nuggets : If you are not using managed disks, we recommend no more than 20 VMs per storage account with overprovisioning enabled and no more than 40 VMs with overprovisioning disabled.
We will use Image Created in Exercise 37, Chapter 2 for deploying VMSS. If you have not done image exercise you can choose any Windows image.
In Azure Portal click +Create a Resource> In search box type virtual machine scale set and click enter>In the result click Virtual Machine Scale set>Click create>Create Virtual Machine Scale set blade opens>Enter a name> For OS disk image click Browse all images>Select an image blade opens>Click My Items> Select the image created in Exercise 37, Chapter 2 > Select RGCloud>Enter username and password (Not Shown)>Autoscale Disabled >Select Load Balancer and enter name for IP & Domain>Select VNETCloud and Web-Subnet>create.
Note : If you have not done image exercise you can choose any Windows image.
Figure below shows the Dashboard of VMSS.
VMSS Dashboard is not showing public IP of the Load balancer . To Know public IP of Load Balancer Click All Resources in left pane>Select RGCloud in Resource Group and in type select Load Balancer> You can see Load Balancer vmsscloudlb.
Click VMSSCloudlb to open the dashboard. Note down the IP Address.
In a browser enter Load Balancer Public IP(52.232.230.14) shown in VMSSCloudlb dashboard. Default website opens.
Note : Using Custom Image is the best way to deploy VMSS. Create a VM and Install Applications, add Disks or NIC etc. Create Image of it. In this way you need not go and install apps on individual Instances.
When you create a scale set in the portal, a load balancer is created. Based on Public IP of Load Balancer, Network Address Translation (NAT) rules are used to distribute traffic to the scale set instances.
Click All Resources in left pane>Select RGCloud in Resource Group and in type select Load Balancer> You can see Load Balancer VMSSCloudlb. Alternatively in All Resources just scroll down and select vmsscloudlb.
Click Load Balancer VMSSCloudlb in All Resources pane>Load Balancer dashboard opens>Click Inbound NAT Rules in left pane> In right pane you can see Instances IP address which is same for both instances but TCP Port for Instances are 50000 & 50001 respectively.
To connect to Instances using RDP use IP address appended with TCP
Port. For Instance 1 connect to RDP using 52.232.230.14:50000
For Instance 2 connect to RDP using 52.232.230.14:50001
Open RDP Application on your PC and enter 52.232.230.14:50000 and click Connect> Enter username and password you entered during VMSS creation
RDP session is opened for Instance 1. Server Manager is already opened.
This is required for Autoscaling exercise otherwise Autoscaling will give error. This error happens if you are using a resource provider that you haven't previously used in your subscription.
In Azure Portal Click Cost Management + Billing in left pane> Cost Management + Billing Dashboard opens. Click Subscription in left pane>In right pane click your subscription>Subscription Dashboard opens. In left pane under settings click Resource Providers> In right pane scroll and select microsoft.insights.
Make sure microsoft.insights is selected>Click Register in Top>After 1-2 minutes it will get registered. Press refresh if required.
Click Scaling in VMSS dashboard>Scaling blade opens in right pane.
Click Enable Autoscale in right pane> Scale Condition Blade opens> we will edit the default scale condition Rule>Enter a name>In Instance limits Enter 4 in Maximum. Note + Add a Rule Link . We will use this to create Scale out and Scale in Rule.
Create Scale Out Rule : In Scale condition pane Click + Add a rule>Scale rule opens in right pane. Note the metrics sources. Metric Sources can be from VMSS or External Sources such as Storage queue or Service Bus Queue etc. For Metric we will select % CPU> In operation Box select Increase count by > Rest select all default values and click Add.
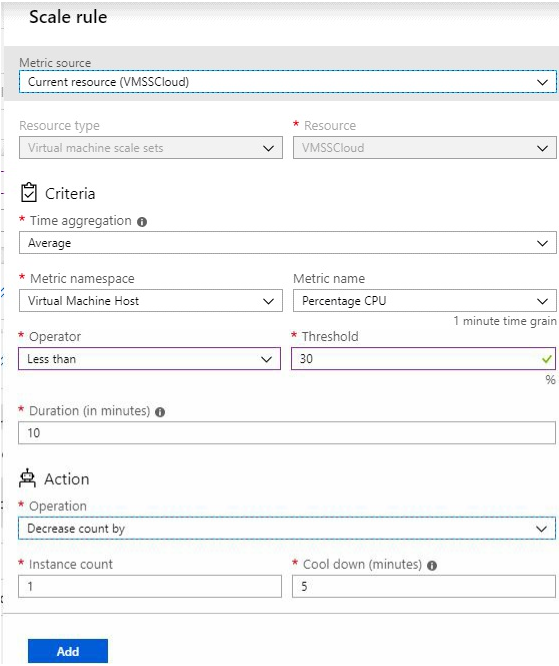
Create Scale in Rule: In Scale condition pane Click + Add a rule >Scale rule opens in right pane. For Metric we will select % CPU>Select less than in operator> Select 30% in Threshold> In operation Box select decrease count by >Rest select all default values and click Add> click Save.
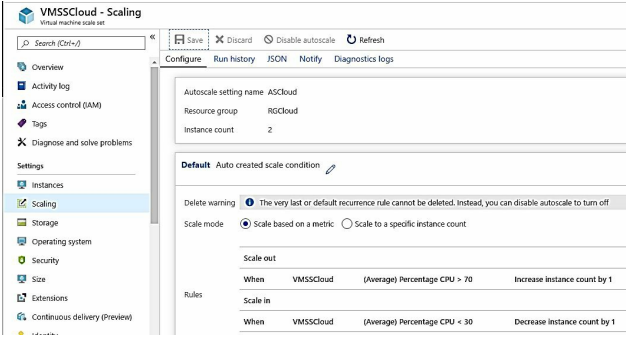
In scaling pane you can see the Scale in and scale out rules created. Make sure to click save so that Autoscaling rules are saved.
Note : Delete the VMSS, Load Balancers & Public IP as we longer need it.

Top Training Courses


LIMITED OFFER: GET 30% Discount
This is ONE TIME OFFER

A confirmation link will be sent to this email address to verify your login. *We value your privacy. We will not rent or sell your email address.
Download Free Demo of VCE Exam Simulator
Experience Avanset VCE Exam Simulator for yourself.
Simply submit your e-mail address below to get started with our interactive software demo of your free trial.


